
HTML5 Media In-Depth Workshop
With Mark Boas / @maboa
Introduction to HTML5 Media
Once upon a time ...
In the beginning, the web was largely a silent and static place, animated gifs not withstanding.
When suddenly there was a sound ...
<EMBED SRC="../sounds/mooooooo.mid">
Flash!
Example of a Flash embed
				      <object classid="clsid:D27CDB6E-AE6D-11cf-96B8-444553540000"
 codebase="http://download.macromedia.com/pub/shockwave/cabs/flash/swflash.cab#version=6,0,40,0" width="500" height="311">
	<param name="allowfullscreen" value="true" />
	<param name="movie" value="http://www.somewebsite.net/player.swf" />
	<param name="flashvars"
	 value="file=http://www.somewebsite.net/trick.flv&image=http://www.somewebsite.net/trick.gif" />
	<embed width="500" height="311" allowfullscreen="true" type="application/x-shockwave-flash"
	 src="http://www.somewebsite.net/player.swf"
	 pluginspage="http://www.macromedia.com/go/getflashplayer"
	 flashvars="file=http://www.somewebsite.net/trick.flv&image=http://www.somewebsite.net/trick.gif" />
</object>
HTML5 Audio and Video
To familiarize yourself with browser support, take a look at the following resources :
- caniuse.com audio support and video support
- Audio and Video in your browser html5test.com
- Audio in your browser in detail areweplayingyet.org
This Course
- Creating your first basic audio and video player
- Encoding media to make it suitable for the web
- MIME type configuration
- Buffering, seeking, preloading and other advanced techniques
- Improving the User Experience
- Adding commonly requested functionality such as playlists
- Integrating media with other HTML5 elements
- Using media in games and other richer experiences (WebRTC)
- Integration with Mobile platforms
- Media Libraries
- Web Audio API
1. Audio and Video Basics
Browser Support* - Desktop
- Chrome 10 +
- Firefox 3.6 +
- Internet Explorer 9
- Opera 10 +
- Safari 5 +
Browser Support - Mobile
- Android 2.3 +
- BlackBerry 6
- Firefox Mobile
- iOS4 +
- Opera Mini / Mobile
Audio Codec Support
| Browser | Ogg | MP3 | AAC | PCM | Opus |
|---|---|---|---|---|---|
| Firefox 3.5 + | ✓ | ✓ *26+ | ✓ | ✓ *14+ | |
| Safari 5 + | ✓ | ✓ | |||
| Chrome 6 + | ✓ | ✓ | ✓ | ✓*9 + | |
| Opera 10.5 + | ✓ | ✓ | |||
| Internet Explorer 9 | ✓ | ✓ | |||
| Firefox Mobile | ✓ | ✓ | ✓ | ✓ | ✓ |
| Safari iOS3 + | ✓ | ✓ | ✓ *4.2+ | ||
| Chrome Mobile | ✓ | ✓ | ✓ | ✓ | |
| Opera Mobile | ✓ | ✓ | ✓ | ✓ | |
| Internet Explorer Mobile | ✓ | ✓ | ✓ | ✓ | |
| Android 2.3 + | ✓ | ✓ | ✓ | ✓ |
Video Codec Support
| Browser | Ogg (Theora Vorbis) | WebM (VP8 Vorbis) | MP4 (H.264 AAC) |
|---|---|---|---|
| Firefox 3.5 + | ✓ | ✓ *4+ | ✓ *26+ |
| Safari 5 + | ✓ | ✓ | |
| Chrome 6 + | ✓ | ✓ | ✓ |
| Opera 10.5 + | ✓ | ✓ | |
| Internet Explorer 9 | ✓ | ||
| Firefox Mobile | ✓ | ✓ | ✓ |
| Safari iOS3 + | ✓ | ||
| Chrome Mobile | ✓ | ✓ | |
| Opera Mobile | ✓ | ✓ | |
| Internet Explorer Mobile | ✓ | ||
| Android 2.3 + | ✓ | ✓ *4.4+ |
Containers
Audio
- Ogg = Vorbis audio
- MP4 = AAC
Video
- WebM = VP8 video + Vorbis audio
- Ogg = Theora video + Vorbis audio
- MP4 = H.264 + AAC
http://en.wikipedia.org/wiki/Comparison_of_container_formats
http://diveintohtml5.info/video.html
Putting audio into a web page
<audio controls>
   <source src="elvis.mp3" type="audio/mpeg" >
   <source src="elvis.oga" type="audio/ogg" >
</audio>

Putting video into a web page
<video width="320" height="240" controls>
   <source src="elvis.mp4" type="video/mp4" >
   <source src="elvis.ogv" type="video/ogg" >
   <source src="elvis.webm" type="video/webm" >
</video>
Fallbacks
Not all browsers support HTML5 audio and video, but you can easily provide an alternative way of playing the media or at least a message to inform the user.
<video width="320" height="240" controls>
   <source src="elvis.mp4" type="video/mp4" >
   <source src="elvis.ogv" type="video/ogg" >
   <source src="elvis.webm" type="video/webm" >
   <!-- add your fallback solution here -->
</video>
See also: Simple HTML5 video player with Flash fallback and custom controls
HTML5 media attributes
- src - url of media
- autoplay*
- loop
- controls - display the controls
- muted
- preload | none | metadata | auto |
- type
- height / width (video only)
Assignment 1 - Build a Player
Embed video and audio into a web page with maximum cross-browser compatibilty and a simple fallback (just a link to the media file will do) Media files are provided. Create the minimal possible markup for an HTML5 web page that contains both audio and video.
Assignment 1 - Solution
2. Tools and Configuration
Tools and services
Many of these tools will encode your media in the format you require, they all have their strengths and weaknesses and you will probably end up using more than one tool.
- Audacity audacity.sourceforge.net
- Miro getmiro.com
- Firefogg firefogg.org
- FFmpeg2theora v2v.cc/~j/ffmpeg2theora
- Handbrake handbrake.fr handbrake.fr
- FFmpeg FFmpeg
- libav libav (FFmpeg fork)
Online encoding services and media hosting
These services will both encode and host your media, be sure to check out the terms and conditions and/or pricing to see if it suits your needs.
- Archive.org Archive.org (Audio and Video)
- Vid.ly vid.ly (Video only)
- YouTube.com YouTube.com (Advertisements!)
- Vimeo Vimeo.com
MIME Type
Your domain's server must give the correct MIME* type for all media URLs.
- MP3: audio/mpeg
- MP4: audio/mp4 video/mp4
- OGG: audio/ogg video/ogg
- WebM: audio/webm video/webm
- WAV: audio/wav
HTACCESS
set the MIME type based on the file extension:
# AddType TYPE/SUBTYPE EXTENSION

AddType audio/mpeg mp3
AddType audio/mp4 m4a
AddType audio/ogg ogg
AddType audio/ogg oga
AddType audio/webm webma
AddType audio/wav wav

AddType video/mp4 mp4
AddType video/mp4 m4v
AddType video/ogg ogv
AddType video/webm webm
AddType video/webm webmv
Assignment 2
- Configure your environment.
- Encode your own media.
3. Introduction to the Media API
Play, Pause, SetMedia, CanPlayType
Let's take a look at a few of the methods.
var myAudio = document.createElement('audio');

if (myAudio.canPlayType('audio/mpeg')) {
   myAudio.setAttribute('src',
    'http://jPlayer.org/audio/mp3/Miaow-07-Bubble.mp3');
}

if (myAudio.canPlayType('audio/ogg')) {
   myAudio.setAttribute('src',
    'http://jPlayer.org/audio/ogg/Miaow-07-Bubble.ogg');
}

alert('play');
myAudio.play();
alert('stop');
myAudio.pause();
Creating your first audio player
First the HTML :
<audio id="my-audio">
   <source src="http://jPlayer.org/audio/mp3/Miaow-07-Bubble.mp3" >
   <source src="http://jPlayer.org/audio/ogg/Miaow-07-Bubble.ogg" >
<!-- place fallback here as <audio> supporting browsers will ignore it -->
   <a href="elvis.oga">http://jPlayer.org/audio/ogg/Miaow-07-Bubble.ogg</a>
</audio>

<!-- we create our play and pause button next -->
<a id="play" href="#">play</a>
<a id="pause" href="#">pause</a>
JavaScript:
window.onload = function(){
   var myAudio = document.getElementById('my-audio');
   var play = document.getElementById('play');
   var pause = document.getElementById('pause');

   // associate functions with the 'onclick' events
   play.onclick = playAudio;
   pause.onclick = pauseAudio;

   function playAudio() {
      myAudio.play();
   }

   function pauseAudio() {
      myAudio.pause();
   }
}
Creating your first video player
Adding a Poster and specifying dimensions of your video player:
<video width="480" height="270"
 poster="http://www.jplayer.org/video/poster/Big_Buck_Bunny_Trailer_480x270.png">
	<source src="http://jPlayer.org/video/webm/Big_Buck_Bunny_Trailer.webm " >
	<source src="http://jPlayer.org/video/ogv/Big_Buck_Bunny_Trailer.ogv" >
	<source src="http://jPlayer.org/video/m4v/Big_Buck_Bunny_Trailer.m4v " >
</video>
JavaScript:
window.onload=function(){
   var myAudio = document.getElementById('my-audio');
   var play = document.getElementById('play');
   var pause = document.getElementById('pause');

   // associate functions with the 'onclick' events
   play.onclick = playAudio;
   pause.onclick = pauseAudio;

   function playAudio() {
      myAudio.play();
   }

   function pauseAudio() {
      myAudio.pause();
   }
}
Assignment 3
Create a custom* video and audio player with play and pause buttons.
*Do not use the controls attribute.
Try and create with maximum x-browser compatibilty and simple links to your media as fallbacks.
Assignment 3 - Solution
4. Buffering, Seeking, Preloading and the User Experience
Preloading
Preloading requests that the media be downloaded (but not played) as soon as the page is loaded.
<audio preload="auto">
Note the preload attribute can take 3 values:
- none - (do not preload)
- auto - (let the browser decide)
- metadata - (preload the metadata only)
Buffered
The buffered attribute will return the time ranges that have been completely downloaded, however if the browser supports it, it makes more sense to use the seekable attribute to determine what parts of the media can be jumped to and played immediately.
// returns TimeRanges object of buffered media
var buffered = myAudio.buffered;

// returns time in ms until which the media is buffered
var bufferedEnd = myAudio.buffered.end();
Seeking and Seekable
Seekable returns a TimeRanges object of playable time ranges. It uses byte-range requests which allows part of the content to be requested over HTTP.
// the player is currently seeking
var isSeeking = myAudio.seeking;

// is the media seekable
var isSeekable = myAudio.seekable;

// the time in ms within which the media is seekable
var seekableEnd = myAudio.seekable.end();
Displaying time and progress
It is useful for a user to both see what part of the media is being played (progress) what has been buffered, preloaded or seekable.
The buffered amount is useful so that the user can know in advance if the file has completely downloaded, seekable tells the user that if they click on a part of it whether it will play immediately.
The bad news is that different browsers implement these features to varying degrees. You can try out various browsers with this HTML5 Media Inspector.
Anatomy of a progress bar
Progress bars are an integral part of a media player and come in many shapes and sizes.
<div id="played-bar">00</div>
<div id="buffer-bar">00</div>
<div id="control-bar">
   <a href='0'>00</a> <a href='10'>10</a> <a href='20'>20</a>
   <a href='30'>30</a> <a href='40'>40</a> <a href='50'>50</a>
   <a href='60'>60</a> <a href='70'>70</a> <a href='80'>80</a>
   <a href='90'>90</a>
</div>
Implementing visual feedback
window.onload=function(){

var myAudio = document.getElementById('my-audio');
var controlBar = document.getElementById('control-bar');

// we add our listeners

myAudio.addEventListener('timeupdate', updatePlayed, false);
myAudio.addEventListener('progress', updateBuffered, false);

function updatePlayed() {
   var played = parseInt(((myAudio.currentTime / myAudio.duration) * 100), 10);
   // gives us a percentage
   addBars(played,'played-bar');
}

function updateBuffered() {
   var loaded = parseInt(((myAudio.buffered.end(0) / myAudio.duration) * 100), 10);
   // gives us a percentage
   addBars(loaded,'buffer-bar');
}

function addBars(amount,element) {
   var bars = "00";
   // since our bars are in increments of 10
   for (i=10; i < 100; i = i + 10) {
      if (i <= amount) {
         bars = bars + " " + i;
      }
   }

   var bar = document.getElementById(element);
   bar.innerHTML = bars;
}
Grabbing input from the progress bar
controlBar.onclick = setTime;

function setTime(e) {
   var playPosition = e.target.getAttribute('href'); // from 0 to 90
   myAudio.currentTime = (myAudio.duration * playPosition)/100;
   myAudio.play();
   return false;
}
Playlists
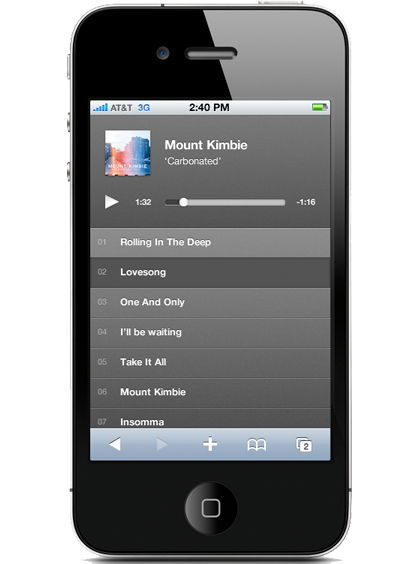
One of the most desired functions for players is the ability to have playlists.
Marking up a playlist
<ul id="tracklist">
   <li class="playlist" >
      <a class="playlist-item"
         href="Miaow-01-Tempered-song">Miaow - Tempered Song</a>
   </li>
   <li class="playlist" >
      <a class="playlist-item"
         href="Miaow-02-Hidden">Miaow - Hidden</a>
   </li>
   <li class="playlist" >
      <a class="playlist-item"
         href="Miaow-03-Lentement">Miaow - Lentement</a>
   </li>
</ul>
You can mark up your playlist in a variety of ways. Here we have created a list of anchor elements (<a>) containing the name of the track and a reference to the corresponding file is placed in the href element.
Linking a playlist to your player
// assuming you have created an audio object called myAudio

var playlistItems = document.getElementsByClassName('playlist-item');
var playlist = document.getElementsByClassName('playlist');
var currentTrack = "";

// we loop through the playlist assigning a click handler to each item

for(i = 0; i < playlistItems.length; i++) {
   playlistItems[i].onclick = playTrackHandler;
}

// the handler gets called every time we click on a playlist item,
// we grab the track from the href set it and play it

function playTrackHandler() {
   var src = this.getAttribute('href');
   currentTrack = src;
   playTrack(src);
   return(false);// stops the event going any further
}

// we check what format the browser can play,
// set the media source accordingly and then play

function playTrack(id) {

   var src = "";

   if (myAudio.canPlayType('audio/ogg; codecs="vorbis"')) {
      src = "http://jPlayer.org/audio/ogg/" + id + ".ogg";
   }
   else if (myAudio.canPlayType('audio/mp4; codecs="mp4a.40.2"')) {
      src = "http://jPlayer.org/audio/mp3/" + id + ".mp3";
   }

   myAudio.setAttribute('src',src);
   myAudio.play();
}

// assuming an element with id shuffle

var shuffleButton = document.getElementById('shuffle');
shuffleButton.onclick = shufflePlaylist;

// this function shuffles the elements

function shuffle(els) {
   var array = Array.prototype.slice.call(els, 0);

   return array.sort(function(){
      return .5 - Math.random();
   });
}

// apply the shuffle to the playlist items on the DOM

function shufflePlaylist() {
   var tracklist = document.getElementById('tracklist');
   tracklist.innerHtml = "";
   playlist = shuffle(playlist);

   for (var i = 0; i < playlist.length; i++) {
      tracklist.appendChild(playlist[i]);
   }

   playlistItems = document.getElementsByClassName('playlist-item');

   return false;
}
Adding loop and successive play
Two commonly requested features of a playlist are the ability to loop and succesively play tracks.
// the ended event fires when the media has finished playing

myAudio.addEventListener('ended', function() {
   for(i = 0; i < playlistItems.length; i++) {
      // locate the current track
      if (playlistItems[i].getAttribute('href') == currentTrack) {
         if (i < (playlistItems.length - 1)) {
            playTrack(playlistItems[i+1].getAttribute('href'));
         } else {
            // start from the beginning (loop)
            playTrack(playlistItems[0].getAttribute('href'));
         }
      }
   }
}, false);
Assignment 4
Add a functional progress bar to your custom audio and video players you created in the last session. Get the basic functionality working.
Basic functionality includes :
- displaying progress of the media
- allowing the user to navigate the media by clicking on the progress bar
Create Playlist Functionality
Assignment 4 - Solution
https://gist.github.com/anonymous/7305048
http://jsbin.com/AqEZAfu/1/
https://gist.github.com/anonymous/7305519
http://jsbin.com/ebaLiFar/3/
5. Subtitles
Add subtitles using WebVTT
The WebVTT standard can be used for:
- Subtitles
dialogue - Captions
sound effects, relevant musical cues, and other relevant audio information - Descriptions
textual descriptions of the video component of the media resource - Chapters
intended to be used for navigating the media resource - Metadata
tracks intended for use from script. Not displayed by the user agent
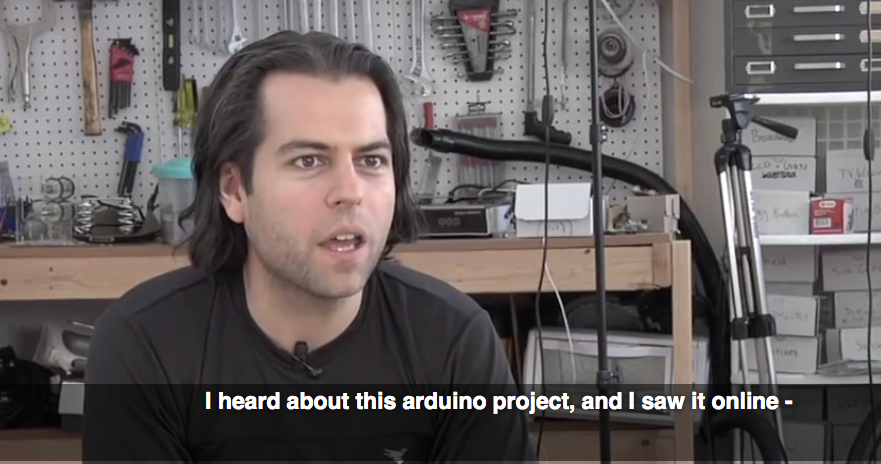
An example of a WebVTT file:
WEBVTT
1
00:00:13.000 --> 00:00:16.100
I heard about this arduino project, and I saw it online -

2
00:00:16.100 --> 00:00:20.100
- and I said "Wow! a lot of people are starting to talk about this.
I should check it out!"
WebVTT Colour Coding
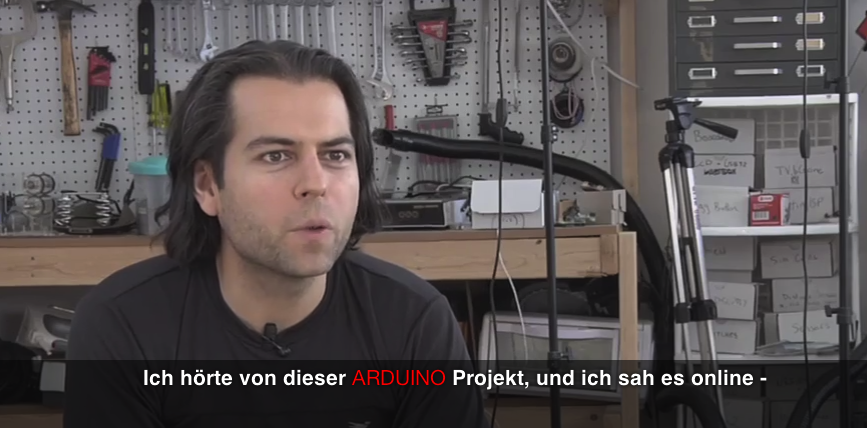
WEBVTT
1
00:00:13.000 --> 00:00:016.100
Ich hörte von dieser arduino Projekt, und ich sah es online -
2
00:00:16.100 --> 00:00:20.100
- und ich sagte "Wow! eine Menge Leute fangen an, darüber zu reden.
Ich check it out!"
Caption Positioning
WEBVTT
1
00:00:13.000 --> 00:00:16.100 A:middle L:10%
I heard about this arduino project, and I saw it online -

2
00:00:16.100 --> 00:00:20.100
- and I said "Wow! a lot of people are starting to talk about this. A:middle L:60%
I should check it out!"
- L: line position
- T: text position
- A: [start | middle | end] alignment
- D: [horizontal | vertical] direction
Speaker semantics.
WEBVTT

00:11.000 --> 00:13.000
<v Roger Bingham>We are in New York City

00:30.500 --> 00:32.500
<v Neil DeGrass Tyson>Didn't we talk about enough in that conversation?
The <v> tag defines the voice or speaker.
Chapters and Navigation
We can also use WebVTT to define chapters of a video for easier navigation
chapter-1
00:00:00.000 --> 00:00:18.000
Introductory Titles

chapter-2
00:00:18.001 --> 00:01:10.000
The Jack Plugs

chapter-3
00:01:10.001 --> 00:02:30.000
Robotic Birds
Using CSS pseudo elements for styling
WEBVTT

1
00:00:13.000 --> 00:00:16.100
I heard about this <c.arduino>arduino</c> project, and I saw it online -

2
00:00:16.100 --> 00:00:20.100
- and I said 'Wow! a lot of people are starting to talk about this.
I should check it out!'
Putting it together
<video>
   <source src='http://happyworm.com/w3c/h5AVcourse/remix.ogv '>
   <source src='http://happyworm.com/w3c/h5AVcourse/remix.mpeg'>
   <track label="English subtitles" kind="subtitles" srclang="en" src="upc-video-subtitles-en.vtt" default>
</video>
Note that for browsers that don't support WebVTT you can use a polyfill.
Include captionator.js in your code and you should be good to go.
WebVTT Support
| Feature | Chrome | Firefox | IE | Opera | Safari |
|---|---|---|---|---|---|
| Basic support | 23 | 24 (disabled by default) | 10 | 12.10 | 6 |
Subtitle - Resources
JavaScript: HTML5 Video with SRT Subtitles
http://blog.gingertech.net/wp-content/uploads/2010/11/WebSRT/
Accessible HTML5 Video with JavaScripted captions
http://dev.opera.com/articles/view/accessible-html5-video-with-javascripted-captions/
WebSRT : Overview of a time-synchronized text format for HTML5
http://www.storiesinflight.com/js_videosub/
JavaScript: HTML5 Video with SRT Subtitles
http://blog.gingertech.net/wp-content/uploads/2010/11/WebSRT/
Captionator Polyfill
https://github.com/cgiffard/Captionator
Assignment 5
Add subtitles to a piece of video.
http://happyworm.com/video/m4v/arduino.m4v
http://happyworm.com/video/webm/arduino.webm
http://happyworm.com/courses/html5media/resources/arduino-en.vtt
Assignment 5 - Solution
https://gist.github.com/anonymous/72982155.5 PlaybackRate *New*!!!
Changing Gear
A new and feature of HTML5 Audio and Video is the ability to change the playback Rate.
var v = document.getElementById("myVideo");
v.playbackRate = 0.5;
Playback Rate - The Good, Bad and Ugly
| Feature | Chrome | Firefox | IE | Opera | Safari |
|---|---|---|---|---|---|
| Basic support | 29 / 29* | 24 / 24* | 10 / 10* | 15 / 15* | 6 / 6* |
* = mobile
Playback Rate - The Bad and Ugly
- When you change the src some browsers will reset to defaultPlaybackRate
- ratechange event works intermitently between browsers
- Moving the playbackrate to extremes can corrupt some browsers
- On some mobile playbackRate only has an effect when paused
Assignment 5.5
Add playbackRate capability to your player
Assignment 5.5 - Solution
https://gist.github.com/anonymous/7375573
http://jsbin.com/omAtEM/1/edit
6.Canvas and WebGL

Canvas and Video
Canvas is a new way of drawing into web pages, it is very powerful and can be coupled tightly with video.
- Write a frame from the video element to an intermediary canvas element
- Read the data from the intermediary canvas element and manipulate it
- Write the manipulated data to your 'display' canvas
- Pause and repeat.
canvasElement.drawImage(videoElement,0,0,width,height);
A Simple Effect
Here's an example of how we would convert a colour video to black and white, in real time!
<video id="video" controls="true" width="480" height="270">
   <source src="http://jplayer.org/video/webm/Big_Buck_Bunny_Trailer.webm"
      type="video/webm"/>
   <source src="http://jplayer.org/video/ogv/Big_Buck_Bunny_Trailer.ogv"
      type="video/ogg"/>
   <source src="http://jplayer.org/video/m4v/Big_Buck_Bunny_Trailer.m4v"
      type="video/mp4"/>
</video>

<canvas id="c1" width="480" height="270"></canvas>

<label for="cb1">Black & White</label><input id="cb1" name="cb1"
   type="checkbox"/>
Plumbing it all in
Now the idea is to copy the data from the video, manipulate it and paint the data to the canvas.
var processor = {
   timerCallback: function() {
      if (this.video.paused || this.video.ended) {
         return;
      }
      this.computeFrame();
      var self = this;
      setTimeout(function () {
         self.timerCallback();
      }, 0);
   },

   doLoad: function() {
      this.video = document.getElementById("video");
      this.c1 = document.getElementById("c1");
      this.ctx1 = this.c1.getContext("2d");
      this.cb1 = document.getElementById("cb1");
      var self = this;

      this.video.addEventListener("play", function() {
         self.width = self.video.width;
         self.height = self.video.height;
         self.timerCallback();
      }, false);
   },

   computeFrame: function() {
      this.ctx1.drawImage(this.video, 0, 0, this.width, this.height);
      var frame = this.ctx1.getImageData(0, 0, this.width, this.height);
      var l = frame.data.length / 4;
      if(this.cb1.checked) {
         for (var i = 0; i < l; i++) {
            var grey = (frame.data[i * 4 + 0] + frame.data[i * 4 + 1] + frame.data[i * 4 + 2]) / 3;
            frame.data[i * 4 + 0] = grey;
            frame.data[i * 4 + 1] = grey;
            frame.data[i * 4 + 2] = grey;
         }
         this.ctx1.putImageData(frame, 0, 0);
      }
      return;
   }
};
More Canvas Examples
video + canvas = magic http://html5doctor.com/video-canvas-magic/
Manipulating video using canvas https://developer.mozilla.org/En/Manipulating_video_using_canvas
Seriously.js http://seriouslyjs.org
WebGL - Paint video in 3D
WebGL – GLGE Updates and Demos .. Video & Canvas Textures Plus Filters

Assignment 6
Manipulate the colour of your video using Canvas.
Assignment 6 - Solution
https://gist.github.com/anonymous/7298357http://jsbin.com/ImohifA/2/
7. WebRTC
WebRTC - the break-down
- Designed for browser-to-browser communication.
- Handles live streaming of audio and video.
- Facilitates the streaming of any type of data.
WebRTC - applications
- Voice Calling / Video Chat
- P2P File sharing
- Inter-application comms
WebRTC - components
- MediaStream API (aka getUserMedia)
for accessing devices such as a camera and mic - PeerConnection API
for connecting client's audio/video streams - DataChannel API
for the real-time P2P transfer of generic data
MediaStream API
Sometimes known as getUserMedia, the MediaStream API allows you direct access to devices, currently the microphone and camera, but in future this could include other devices.
Audio and video are split into synchronised MediaStreamTracks. Effects can be applied to the video using canvas.
PeerConnection
Getting access to devices such as cameras and microphones is of limited use if you don't connect those streams. The PeerConnection API allows you to do this.
You will need a 'broker' in the cloud to be able to discover and connect to other peers, you can use your own WebSocket server, Google App Engine or something called SIP over WebSockets.
Thankfully the PeerConnection API makes this all relatively painless and quietly deals with the issues of lost packets and the general quality of streamed audio and video.
Data Channel
The DataChannel API makes it possible to stream any data you can think of. It deals with any issues that might occur in the pipeline and includes features such a channel prioritisation, security and automatic congestion control, leaving the developer to focus on the application of that streamed data.
More info An Overview of WebRTC - the most disruptive HTML5 technology to date?
WebRTC Support
| Chrome | Firefox | IE | Opera | Safari | iOS | Android |
|---|---|---|---|---|---|---|
| 23 / 29* | 22 / 24* | 12 / 12* | -- | -- | -- | -- |
MediaStream Example
For backwards compatability...
navigator.getUserMedia ||
  (navigator.getUserMedia = navigator.mozGetUserMedia ||
  navigator.webkitGetUserMedia || navigator.msGetUserMedia);

window.URL = window.URL || window.webkitURL || window.mozURL || window.msURL;
Hooking It Up
<video id="webcam"></video>
if (navigator.getUserMedia) {
   navigator.getUserMedia({
      video: true, audio: true
   }, onSuccess, onError);
} else {
   alert('getUserMedia is not supported in this browser.');
}

function onSuccess(stream) {
   var video = document.getElementById('webcam');
   var videoSource;
   videoSource = window.URL.createObjectURL(stream);
   video.autoplay = true;
   video.src = videoSource;
}

function onError() {
   alert('There has been a problem retreiving the streams');
}
Further Resources
Real-Time Communication without Plugins
WebRTC is almost here, and it will change the web
Video Conferencing in HTML5: WebRTC via Web Sockets
Record audio using webrtc in chrome and speech recognition with websockets
Bowser - the First WebRTC enabled Browser for Mobile
Assignment 7
Capture the stream from you camera and mic and display it in real-time
Assignment 7 - Solution
https://gist.github.com/anonymous/7298590 http://jsbin.com/eQudoCA/1/ http://jsbin.com/AbOQuPU/1/8. Advanced Audio
Audio (and Video) Limitations

- Mobile browsers disable autoplay
- Mobile browsers disable preload
- Various browsers do not handle short sounds very well
- Latency between issuing play and actually playing
- Often cannot play more than one piece of media at a time
Working around Autoplay Disabled
1. Detect any user initiated event to play the media.
This could be any event at all, a common one to use is to detect the 'touchstart' event on the HTML body.
2. Use the iFrame trick (iOS)
If you set the src attribute of an iFrame to an audio file, it will start playing automatically. Note that this considered a bug by Apple and may not work in future versions of their operating system.
Handling short audio clips with audiosprites
One technique for handling the shortcomings of browsers when it comes to playing short audio clips is to combine the clips into longer pieces of audio (an audiosprite) and just play the appropriate part of the audio when it is required.
See http://remysharp.com/2010/12/23/audio-sprites/ and example here : http://www.phpied.com/audio-sprites/
Web Audio API
The Web Audio API is an extensive high-level, node-based audio API.
- modular routing
- spatialized audio
- convolution engine
- low latency
- dynamically generated
- processing of audio sources from an <audio> or <video>
- real-time time-domain and frequency analysis
- music visualizer support
More Info: W3C Web Audio Spec
Web Audio API
- High Level
- Dynamically Generated
- Node based
Compatability
| Chrome | Firefox | IE | Opera | Safari | Android (stock) |
|---|---|---|---|---|---|
| 10+ / 30+* | 26+ / 26+* | -- | 15+ / --* | 6+ /iOS 6+* | -- |
* = mobile
Node Based
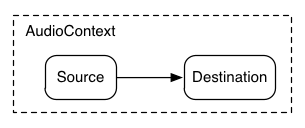
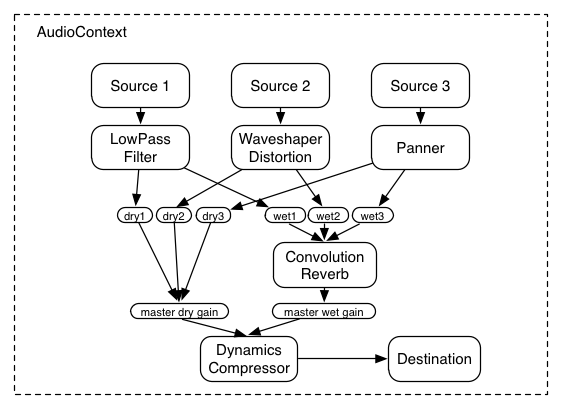
Web Audio API is node based, that is to say - you connect your input to your output and have any number of nodes that affect the audio in between. This is based on established systems that audio engineers are practiced in creating.
This gives us a certain flexibility and importantly great modularity.
Modular Routing
AudioContext
A bit like canvas context but there can be only one.
The AudioContext acts like a holder for all your audio activity.
var context;
if (typeof AudioContext !== "undefined") {
   context = new AudioContext();
} else if (typeof webkitAudioContext !== "undefined") {
   context = new webkitAudioContext();
} else {
   throw new Error('AudioContext not supported. :(');
}
Load a Sound
function startSound() {
  // Note: this loads asynchronously
  var request = new XMLHttpRequest();
  request.open("GET", url, true);
  request.responseType = "arraybuffer";

  // Our asynchronous callback
  request.onload = function() {
    var audioData = request.response;
    audioGraph(audioData);
  };

  request.send();
}
Grab the Data
function audioGraph(audioData) {
  // create a sound source
  soundSource = context.createBufferSource();

  // The Audio Context handles creating source buffers from raw binary
  soundBuffer = context.createBuffer(audioData, true/* make mono */);

  // Add the buffered data to our object
  soundSource.buffer = soundBuffer;

  // Plug the cable from one thing to the other
  soundSource.connect(context.destination);

  // Finally
  playSound(soundSource);
}
Note On, Note Off
// Finally: tell the source when to start
function playSound() {
  // play the source now
  soundSource.noteOn(context.currentTime);
}

function stopSound() {
  // stop the source now
  soundSource.noteOff(context.currentTime);
}

// Events for the play/stop bottons
document.querySelector('.play').addEventListener('click', startSound);
document.querySelector('.stop').addEventListener('click', stopSound);

init();
Assignment 9 - Solution
Play audio through the Web Audio API
http://jsbin.com/umIdeHE/1/edit